Prototyping - Mission Gameplay Design
Now that we've finished out single biggest programming segment, we'll go right in to the largest design part in the project. The good news is that we're on to the fun part of the game: The action gameplay sequence!
I've broken the gameplay down in to several parts that we'll tackle one at a time:
We'll drive the briefing scene with the five objects (four of which are pictured above)
| Gameplay Element | Notes |
|---|---|
| World Map | We can't do much in the world until the map and city exists. We'll get the sprites loaded and collision points in place. |
| Ship Actions | Then we get a single ship in the world and take care of basic actions like movement, shooting, and collisions |
| NPC Ships | It's not much of a game without more ships. |
| HUD | We need to get basic statistics and information displayed so we can build out the game goals. |
| AI | Once we get ships moving according to a plan, then we get start to flesh out the missions |
| Mission Goals | We'll take missions in two parts. First by getting a default (kill all enemies) mission then actual goals. |
The Map
There's some work to do with the map. Remember that we left the MAP files in their original data file form (TD?.MAP). Now have to import those files in to GameMaker, but there are several technical challenges. Our MAP file workflow can be summarized in this graph:
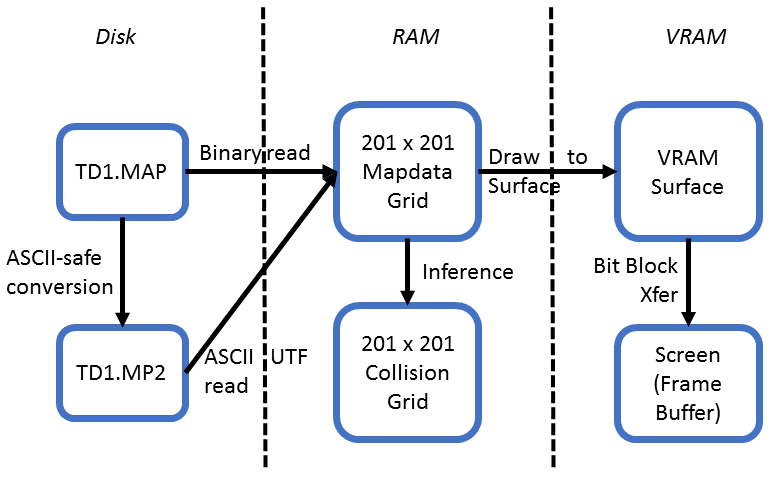
I intend to host the project in HTML5 using the built in GameMaker runner for the platform. One limitation of the platform is that we can't do binary reads from included data files. We have to read the data as text. This complicates reading the data file because text reads don't interpret certain control characters below 0x20. We'll have to convert the original MAP files in to a format that is safe for text reads.
Once we have the map data loaded in to memory in our application, we'll have to infer which of the squares are passable or not. This will be a binary field based on the sprite value where '1' is a collision, and '0' is open space (e.g. a road tile).
For displaying the map, we want to put the pieces together in VRAM and blit to the screen buffer. This is very fast but does take a bit more resources. In contracts, we could draw the map from RAM every frame, which is much more processor intensive. I'll demonstrate both approcahes in the next part. Ideally, we would trade off both approaches to find an accetable method (drawing partial map sectors, and making use of mipmaps if we're using multiple zoom levels). Lots of methods exist, but we're going to go simple and fast (project theme!).
Ship behaviors
Ships will have a lot of things going. Ultimately, they produce all the 'action' in the game and so we'll have to pay careful attention to the order of processing within GameMaker. Recall in our engine dicussion that the engine has quite a few places that an object can execute code. We'll use most of them with the ships as we implement this lifecycle loop:

We have quite a few tasks to squeeze in to our order of events. For instance:
| Controls | Variables | Other |
|---|---|---|
| Arrow Keys to move | Shields, Armor, Speed, Ammo | Process actions with bitflags |
| Space to fire | Fire delay timer | Base ship stats on actual game values |
| Tab to change weapons | Turn delay timer | Increase speed in GM units of 1 |
| Escape to self destruct | Ship Type | Collisions use a 2-point check |
| Ship Alignment | Bounce effect with -abs(speed) | |
| Motion friction is 5% |
NPC Ships
Loading NPC ships calls for reading the mission data files and creating the 20 new ships. Each of those ships will have a set of waypoints as we discussed back in Part 13. Unfortunately, we'll have to alter the files to ensure safe reading as text just like we did with the MAP files.
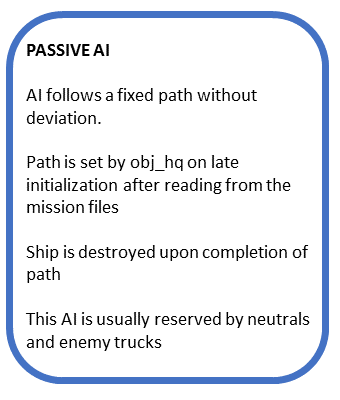
We'll start by giving the ships a passive AI, that probably should be called a path-following AI. We'll have an AI object attached to the ship that sends commands to the ship in the same way that the keyboard sends objects to the player's ship.
Heads-Up Display (HUD)
The HUD feeds the information to the player as a bar at the bottom the screen with several widgets constantly updating.

| Gameplay Element | Notes |
|---|---|
| Player Status | Horizontal bars depicting shields and armor. We'll break the bars in to 12 segments and normalize the ship statistics to the bar lengths. |
| Direction Finder | Shows the relative location of all ships and home base relative to the player. We'll make an 8 position array for each direction and loop through all targets and count each bucket. Add red/blue intensity to the final draw. |
| Missile Data | Backlight the missile picture and count the ammo. |
| Minimap | Shows the immediate area around the player. We'll make two surfaces, one showing the collision map which never updates. The other holds all active objects, which clears and updates every frame. |
| Current Weapon | A weapon showing the current graphic. |
| Comlink | A flashing 'F6' message that indicates an incoming communication. This should spawn a blocking object showing the message and the speakers. |
| Message Ticker | A banner scrolling in from the right that holds a message. Each part of a mission kicks off with a message indicating purpose. |
AI
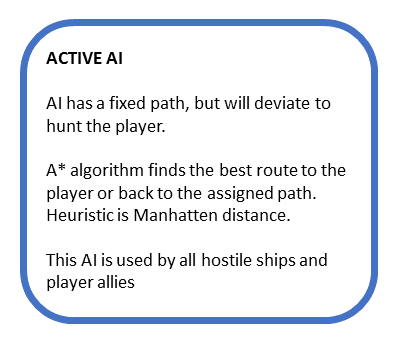
The game wouldn't be very interested unless the NPC ships responded to and fought against the player. To do this, we need to program an active AI. What this really means is that we need to ships to change their intermediate goals by building alternate paths and judging when to attack the player. We'll do this by implementing the A* algorithm on the collision map using Manhattan distance as the admissible heuristic.
Between the passive and active AI, we end up with 5 separate behavior modes:
| AI Mode | |
|---|---|
| Inactive | AI is not doing anything (sleeping or blocked) |
| Move | AI is following the pre-determined path from the mission file |
| Hunt | AI is following a custom A* path that leads towards the target (player or another ship) |
| Path Seek | AI is following a custom A* path leading back to the next waypoint of it's mission path |
| Finished | AI has completed it's mission and exited the scene |
Missions
We have our setting and our actors, now we need to give them objectives. We'll handle this in 2 stages. First, we'll create a default mission where the general goal is to destroy all enemy ships and return to base. This leads naturally to the actual mission, which requires distributing the ships across several waves and destroying specific targets.

Default Missions
Destroy all enemy ships and return to base. Using the model above, we'll simply assign all the ships to a single wave and release them in to the city. The headquarters object was already used to load the NPC ships, and now we'll give it another purpose to handle returning to base.
Missions 1
We'll expand the framework for the default to include multiple waves per mission and assign messages that trigger for the wave. With a good organization, we can create a method of quickly adding new missions to the game. After this, extending the game is a simple task: Find the mission information and add it to our content scripts. We'll complete mission 1 here in the prototype by modifying several content scripts.
| Content Type | |
|---|---|
| Mission Parameters | Sets the play ship and mission constraints such as night time. |
| Mission Waves | Assigns the 20 NPC ships to waves and sets the total number of waves |
| Mission Messages | Sets the messages for each wave that triggers at wave start. |