Prototyping - Mission Briefing Design
The briefing brings quite a few tasks that we'll weave together with objects and scripts in to a cohesive approximation of the original Traffic Department scene. We'll need a controller object and a handful of support objects that we can combine to form every briefing in the game.
Briefing Flow
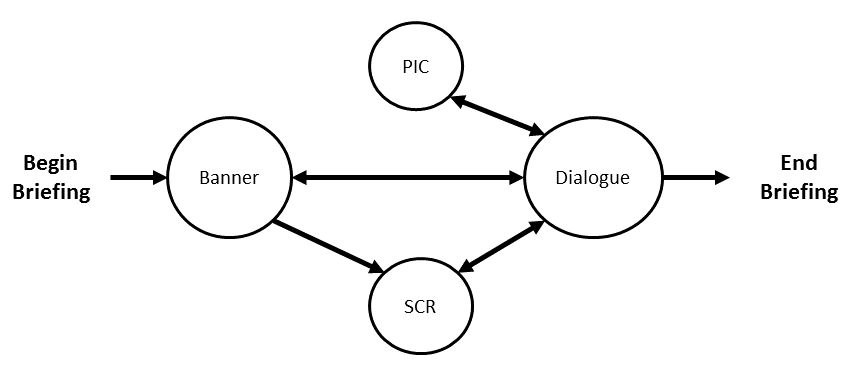
A new mission always starts with a new banner and usually leads to a splash screen showing a setting. Then we see two or more characters in a dialogue sequence. This describes the minimum briefing in the game. However, there could be any number of scenes, popups, or other effects that could happen. We'll rely on a set of objects and a storyboard for each mission that generates the objects on cue.
This diagram shows the possible sequence of objects and events that we can use to make a briefing. Not pictured is a briefing controller object that manages the child objects.
Briefing Objects
We'll drive the briefing scene with the five objects (four of which are pictured above)
| Object | Notes |
|---|---|
| Briefing Controller | Spawns child objects according to the storyboard for the scene. It also loads all the dialogue from the dialogue files that we analyzed back in part 12. |
| Banner | A text popup centered in red and always the first object in the scene. Used for mission titles and sometimes used for inter-scene notifications |
| SCR Screen Loader | A full screen setting graphic with text overlay. |
| PIC Screen Loader | A special event graphic usually centered on the screen. |
| Dialogue Sequence | The fun part of the briefing. Characters talk with one another according to the script for the scene. |
Banners, SCRs, and PICs
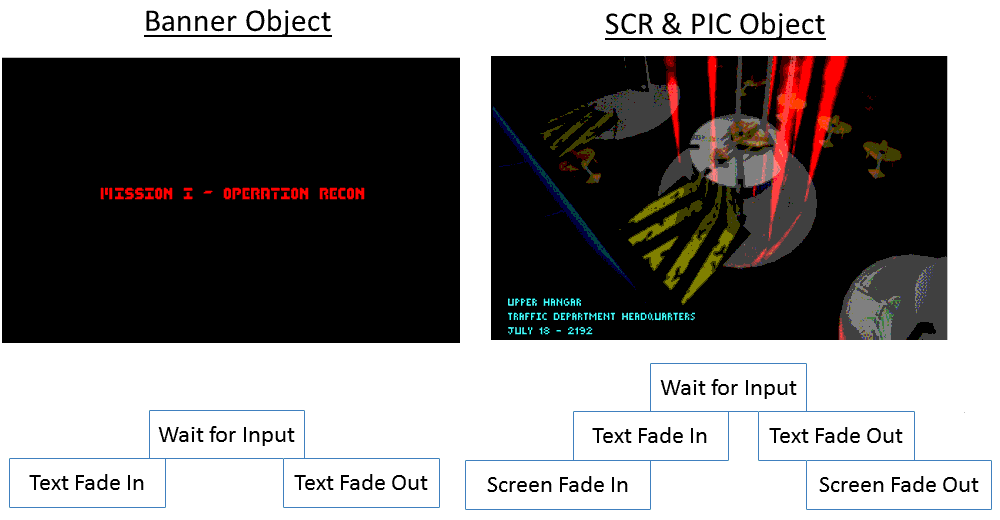
The Banner, SCR, and PIC objects are dediated to static display of text and graphics. The banner object fades in text, waits for user input, then fades out. Both PIC and SCR fade in a pictures, text, then wait for input before fading out. Not all PIC objects have text. In all cases, the controller object spawns the appropriate object based on the storyboard for the mission and then sleeps until the object destroys itself.
Dialogue

The dialogue object does three high level tasks: It reads forward in the script to determine what is coming up; it writes the text progressively to the screen; and it waits for user input.
Text parsing is one of those evil chores that every developer has to do from time to time. One thing we will definitely need is a line-breaking algorithm to determine when to stop drawing on one line and move to the next. We'll also need a way to scroll a text buffer by line. For both problems, I'll opt for inferior solutions for simplicity.
Line breaks
When streaming characters across the screen, we have to know when to change to the next line. Ideally, we want to to happen between words and without excessive blank space. A 'correct' solution would be to read the length of the current word, estimate the remaining width left and if it fits, draw the word. Repeat. I'm going to opt for 'streaming' solution that doesn't involve looking ahead, but is only approximately correct. Every several briefings, it will fail to break and we lose a word.
The pseudocode is: Write characters until there is a space. If we're more than 75% across the screen, start a new line. Otherwise coninue writing on the same line. This will fail whenever there is a very long word that hits towards the end of a line.
Text buffer
We'll have ten rows of text always visible on the screen. This text is stored in a string array of at least size 10. We're going to just keep the current line (bottom row) as row 0 and shift all lines up. This does involve doing 10 copies every time we shift. It's simple, and in the case of only 10 rows, it works fine and is easy to follow for beginner programmers.
The best solution (in my opinion) is to use a modular ring buffer and a pointer that moves through each position and wraps back to the beginning. We print characters to the pointed row while drawing all other text lines relative to the pointer. This is the natural solution, so of course I decided to avoid it.
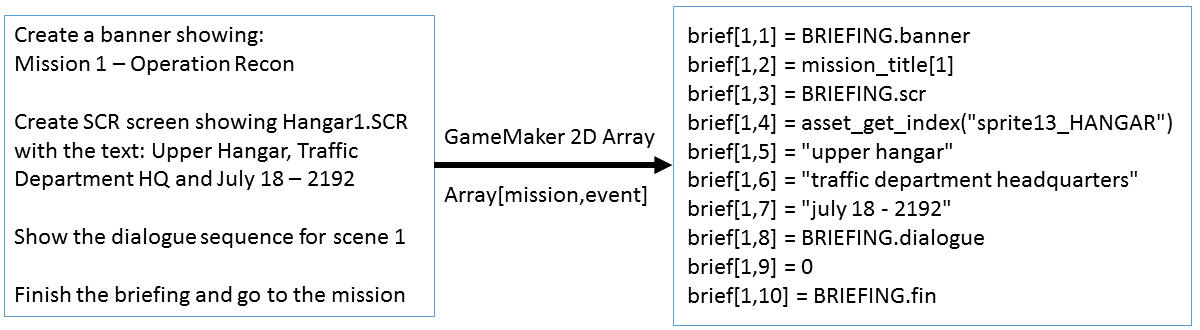
Storyboard Example: Mission 1
Each mission will have a storyboard to follow for each mission. This is what we'll use for mission 1: